Tuesday, December 31, 2013

Let's Stamp Something!

For the last day of 2013....let's stamp something! I wanted to share with  you how great the WorldWin cardstock is for stamping! (I originally made this card for a guest spot for Our Daily Bread Designs Stamps. I think you will agree, that is is worth a second look!)
I created a 5x5 inch card with Treasures Pitch Black cardstock. The Treasures line is a heavy-weight, textured cardstock. I use vast quantities of the Pitch Black and Deep Brown! It is thick, rich, and has just the right amount of texture!

I used some pretty papers from Graphic 45 for my background. I pierced around the blue square (with an old Stampin' Up piercing template). Some of the piercing was a bit wonky, so I distressed the paper to hide it. (Hey, we all have our secrets!) I love the boat and map stamp from ODBD (Surging Sea). I stamped it onto ColorMates Original Light Totally Tan cardstock and matted it with blue designer paper. The Light Totally Tan cardstock is my go-to "not quite white" cardstock. It matches the vintage look of the card perfectly!
I stamped the sentiment onto a scrap of Light Totally Tan cardstock and die cut it with a circle template. I sponged some blue ink onto the paper before removing the template. That gave me a border all around the circle to follow with my piercing tool. You can see I did not do a perfect job, but close enough.

Images and sentiments stamp so nicely onto the cardstock! Can you see why I like it so much?!

My favorite part of the card, aside from the stamping, is the "crumpled" edge. I simply placed a bit of printed paper at the lower right corner of the card, then I folded back the other layers to reveal the revers of the printed paper! So easy!
I really love how this card turned out. It's masculine, but still pretty. I love how rich the WorldWin cardstock looks! (I dipped into my Graphic 45 French Country papers. I love the 8x8 and 6x6 pads!)
 I also decorated the inside of the card. I lined the card with more of the Light Totally Tan cardstock, and then added a border from printed paper. I stamped the image onto Light Totally Tan, die cut it, and sponged it with ink. I cut a mat from a scrap of Treasures Pitch Black.
I carried the piercing into the inside as well. I did a bit better job this time!

Thanks for looking! I hope all of you have only rainbows in 2014! Happy New Year!

~ Gloria (Scraps of Life)


WorldWin Paper:
Treasures Pitch Black
ColorMates Original Light Totally Tan

Other:
Stamps: Our Daily Bread Designs Sentiment Collection 2, Surging Sea
Designer paper: Graphic 45 French Country 8x8 and 6x6 pads
Ink: Tsukineko Memento Tuxedo Black, Clearsnap Colorbox Fluid Chalk French Blue
Die cuts: Spellbinders Standard Circles Large and Small
Twine: Really Reasonable Ribbon
Adhesive: Scrapbook Adhesives by 3L foam squares; Scotch 3M ATG tape

Monday, December 23, 2013

Soft and Pretty Christmas Cards

Hello everyone! It is down to the wire, and if you still need to make some Christmas cards, these simple designs will be great for you to try! (I originally made these cards for Couture Creations, but since I used all WorldWin cardstock, I decided to share the cards here as well.)

The two cards I want to share today are in a "country Christmas" theme. I wanted the cards to be fairly easy to mail. I also wanted to create some cards that use embossing folders - which show off the amazing cardstock - plus just a few, simple items so that you could make a bunch of cards at one time. (Both cards are standard size - 5 1/2 x 4 1/4 or A2.)
For this card, I simply made a card base from ColorMates Original Deep Racy Raspberry cardstock and lined it with Kraft cardstock (for adding a sentiment on the inside of the card). I then embossed another piece of Kraft cardstock with a Christmas-themed embossing folder that is folder and greeting all in one.
Using a Sponge Dauber, I gently rubbed white ink over the embossed cardstock. I love the "snowy" look of the white ink on the kraft cardstock. After I trimmed the panel to size, I rubbed more white ink around the edges.
To finish the card, I added some twine and a faux vintage button.
The card has a lot of texture and interest, but is actually quite flat, and easy to mail. If you are worried about the button making the card too bulky, you could just add the twine and leave the button off. 

I decided to create a second card using the "chalk ink" technique. This is one of my all-time-favorite embossing techniques. It's an oldie, but a goodie!

I created an card base with ColorMates Smooth and Silky Beach cardstock and embossed ColorMates Original Deep Berry Red cardstock with the embossing folder.
This time, I rubbed the embossed cardstock with a creamy white ink for a softer look. To add some extra fun to the card, I placed self-adhesive pearls on a few of the berries. (This makes the card a bit bulkier. You may need to add a sheet of thin cardstock to the inside of your envelope when mailing this one.)

The sentiment is something that I cut from designer paper and matted with Heritage Black cardstock. So easy! You can find lots of premade sentiments and sayings to make card making go quickly -  when you are in a last minute rush!

I also created a lace flower from a scrap of leftover lace. To make the little blossom, simply use some thread to place a running stitch across one long edge of the lace. Pull the threads to gather the lace, and tie off the ends. I added a pearl to the center of the flower. I also die cut a swirl from ColorMates Smooth and Silky Barley Grass cardstock to use behind my lace flower. 

I hope you are inspired to create some quick and easy Christmas cards! Thanks for joining me today! 

~ Gloria (Scraps of Life)


WorldWin Papers:
ColorMates Original Deep Racy Raspberry, Deep Berry Red, Heritage Black
Kraft
ColorMates Smooth and Silky Beach, Barley Grass

Other Supplies:
Designer paper: Heidi Swapp Believe
Stamping ink: Clearsnap Colorbox Pigment Cream White; Stampin' Up Whisper White
Button: Stampin' Up
Lace: Really Reasonable Ribbon
Twine: May Arts
Die cuts: Couture Creations Mimi
Embossing folders: Couture Creations Christmas Lyrics, Moonlit Berries
Self-Adhesive Pearls: Couture Creations

Wednesday, December 18, 2013

Altered Printer's Tray - Naughty or Nice?

Good morning, WorldWin Fans! I know that most of the time we share "cardstock heavy" projects with you here. However, I wanted to share how you can combine several bits of the different types of WorldWin cardstocks into ONE great project! WorldWin has so many great papers to choose from!
I am a huge fan of altering "stuff." I have had this little 7 Gypsies printer's tray in my stash for a while, and I got the 7 Gypsies Santa's Journey 8x8 paper pad from my guest design spot at CropStop,com. Perfecto!  

This tray is 6 1/2 x 6 1/2 inches in size, which is great for a weekend project. I placed some of the Santa's Journey paper into the largest opening, and then matted the Santa image (cut from another piece of the paper) onto Petallics Wine Cup cardstock. Santa is attached with foam tape to the center of the opening.

I created a Christmas "spray" around the edge of the tray with die cut shapes (Couture Creations Missoni die) and a few other odds and ends. I cut the "vine" from Kromekote Silver cardstock. I rubbed the die cut shape with some sandpaper to "rough it up" a bit.
I die cut a paper rosette (Tim Holtz Rosette) from the Petallics Wine Cup cardstock, and then rubbed it with some white ink. I cut the ornament (Spellbinders Mix n Match Ornaments) from Kromekote Silver and White cardstock, and then backed it with a circle of the Wine Cup. It seems a bit fussy, but...so pretty and sparkly! I topped the ornament with some "rustic" twine and a Newsprint Candi Dot.

I found the sparkly pine cones in the craft store last year, and naturally purchased a whole bin of them! They make a great accent!
I fussy cut the Nice list is from the Santa's Journey paper. I used various layers of foam tape to attach the list, making it look "rolled and wrinkled." 
I die cut a reindeer (Tim Holtz mini reindeer) from Kraft cardstock. I rubbed the shape with some white ink. I cut a little tag for this corner of the tray. I stamped a sentiment on the tiny tag. Who knew I had stamps that tiny?! I added some Glossy Accents to the "25" to make it shiny.
For the middle opening, I embossed a small piece of the Wine Cup metallic cardstock (Couture Creations Jolly Christmas folder), then added a postage image that I fussy cut from the designer paper, and a bit of bling I found in my stash.  

For the last opening, I filled a bottle cap with Glossy Accents, and placed silver bells and some white and red microbeads inside. (Once the glue dries, the items stay in place.) I fussy cut another postage image for this area.
You can see that I only used bits and pieces of cardstock, but what a festive and shimmery impact! I hope you enjoyed my project for today. For a full supply list, see below.


~ Gloria (Scraps of Life)

WorldWin Papers:
Petallics Wine Cup
Kromecote White, Silver Foil
Kraft

Other:
Designer paper: 7 Gypsies Santa's Journey Paper Pad
Embellishments: Candi Dots Newsprint; Pine cones, silver bells (craft supply); Paper Stdio bottle cap
Ink: Tsukineko Memento Tuxedo Black; Ranger Distress Vintage Photo
Paint: Ranger Distress Picket Fence
Die cuts: Tim Holtz Alterations Rosette, Movers and Shapers Mini Reindeer; Sweet n Sassy Stamps TagSpellbinders Mix n Match Ornaments; Couture Creations Nesting Dies, Circles, Sophia, Missoni
Embossing folder: Couture Creations Jolly Christmas
Tray: 7 Gypsies
Stamp: Flourishes
Twine: May Arts
Deco scissors: Provocraft
Adhesive: Ranger Glossy Accents; Couture Creations foam mounting tape; Scotch 3M ATG tape

Monday, December 16, 2013

In the Bag

If you want to make your gift bags look special this year, why not decorate them.  WorldWin's Petallic Papers are so sparkly- they add a touch of glamor to any project.

.


I stamped JustRite Christmas Holly Background onto Elan Metallics (Moss) and embossed it with silver powder.  I colored in parts of the image with Copic Markers to bring out the design more.  I layered this panel with JustRite's Vintage Labels Six die - and used the script portion of the Merry Christmas Background stamp for the central oval (on Petallics - Silver).  I created a flower using Spellbinder's Layered Poinsettia -  cut from Petallics - Wine Cup and used May Arts silver leaves to frame it.  I finished the rest off with other May Arts ribbons and some blingy Christmas greenery I got at my local craft store.  Now I just have to finish my shopping to have something to go in this pretty little bag!

Friday, December 13, 2013

White Christmas

Clean and simple cards (CAS) are all the rage these days. I confess that this is a style that I am not very good at, but I think this card shows my own version of CAS.


I created a card with the ColorMates Original Deep Berry Red Cardstock. I trimmed a scrap of printed paper to decorate the top of the card. This card design is a great way to use up paper scraps!

I embossed WorldWin Paper Kromekote White cardstock with the Couture Creations Peaceful Ornaments folder. I trimmed off the bottom portion of the embossed image so that only the ornaments are visible. I made sure that the embossed cardstock and the printed paper were the correct size for my card front, and then I tied a green seam binding ribbon around the seam before attaching the panels to the card front.

I added self-adhesive gemstones to each of the embossed ornaments. You need some bling at Christmas!


I added a sentiment, which is one of my very own stamp designs, put out by Hampton Art. I stamped onto Heritage White cardstock and cut out the sentiment with a shaped die template. I rubbed the edges of the sentiment with green ink.

I lined the card with more of the Heritage White cardstock.

I hope you are inspired to create some quick and easy and trendy Christmas cards! Thanks for joining me today! 

~ Gloria (Scraps of Life)

WorldWin Papers products:
ColorMates Original Deep Berry Red, Heritage White
Kromekote White

Other products:
Embossing folder: Couture Creations Peaceful Ornaments
Die cut shapes: Couture Creations Victorian Rectangle
Designer paper: Heidi Swapp Believe
Stamps: Hampton Art/Gloria Stengel Designs Merry Little Christmas
Stamping ink: Clearsnap Colorbox Archival Tree Frog, Red Devil
Seam binding: Really Reasonable Ribbon
Gems: Couture Creations

Monday, December 2, 2013

Spectacular Spin Thank You Card


Good morning,! It's Gini here and it is great to be back after a nice long Thanksgiving break.  I have to admit, I had gotten some of the Spellbinders tuck and fold dies awhile back, and hadn't really done much with them.  But I have pulled them out to show you how spectacular they look, when paired with WorldWin Papers Double Mates.

I used the Spring Green (which has the darker green on the backside).  I cut the 3 different sized medallions from the Spectacular Spin die and folded and layered them.  I layered the medallion on Colormates in French Malt. This made a really flashy card in a matter of minutes.

So if you know you are going to have lots of Thank You notes to write, this is an easy card that still will have people wondering how in the world you did it.

Thursday, November 28, 2013

Thinking of You

Hello, WorldWin Fans! Happy Thanksgiving to the USA readers! 

I wanted to show you how to create a simple card using embossed cardstock and a large sentiment.  

When I collect a new embossing folder, the first thing I do is emboss it, using whatever cardstock I have close by. I also will emboss various types of cardstock to get a feel for how the impression will look with different weights and textures of cardstock. As a result, I collect stacks of embossed patterns! It is easy to pair these embossed prints together to make quick cards!

To create this card follow these steps:

1. Make a 5 1/2 x 4 1/4-inch, top-fold card from ColorMates Originals Deep Terra-Cotta cardstock.

2. Emboss Elan Metallics Mocha cardstock with the Extra Loren Embossing Folder from the Couture Creations Elegance Collection. 

3. Use an ink applicator to rub the embossed Mocha metallic cardstock with rust ink. Trim the panel to slightly smaller than the card front. 

4. Emboss the ColorMates Smooth and Silky Barley Grass cardstock with the Poetry Embossing Folder from the Couture Creations Elegance Collection

5. Using an ink applicator, rub the Barley Grass embossed cardstock with green ink. Trim the panel to 4 3/4 x 3 inches and mat with Deep Terra-Cotta cardstock. Attach to the left side of the embossed Mocha metallic cardstock.


6. Stamp a large sentiment onto ColorMates Original Light Totally Tan cardstock with brown ink and cut out with a rectangle nesting die.

7. Mat the sentiment with a Deep Terra-Cotta rectangle cut with a scallop rectangle nesting die. Attach the sentiment to the other panels with foam adhesive tape.

8. Wrap twine around the embossed panels and secure. Attach the panels to the card front.

9. Tie a button onto the card with more twine.

10. Line the inside of the card with Light Totally Tan cardstock.

~ Gloria (Scraps of Life)

Supplies Needed:

WorldWin Cardstock:
ColorMates Smooth and Silky: Barley Grass
ColorMates Original: Deep Terra-Cotta, Light Totally Tan
Elan Metallics: Mocha

Other supplies:
Embossing folders: Couture Creations Extra LorenPoetry
Die templates: Couture Creations Nesting Dies Rectangle, Scallop Rectangle
Ink: Clearsnap Colorbox Archival Tree Frog; Clearsnap Colorbox Chalk Burnt Sienna; Tsukineko Memento Rich Cocoa
Stamp: Stampin' Up
Twine: May Arts
Button: unknown
Adhesive: Glue Dots adhesive dots; Couture Creations foam mounting tape, double-sided tape

Tuesday, November 26, 2013

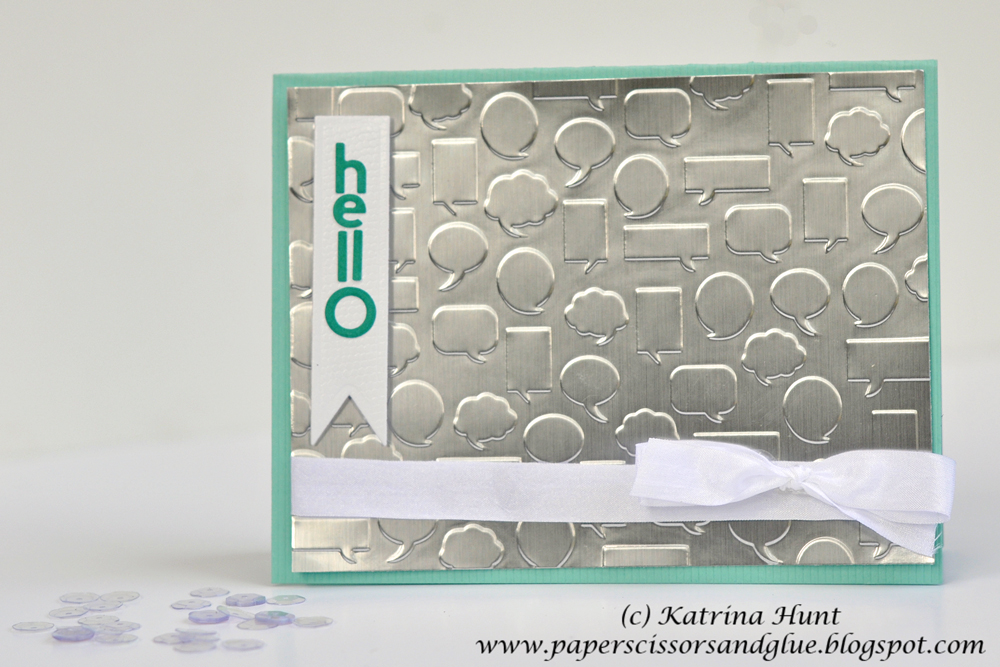
Clean and Simple Kromekote Card

Hey there, it's Katrina on the blog today.  I just have a quick card share with some Colormates Textured  and Kromekote papers.

I only used three papers on this card, but a clean and simple card was the best way to show how beautiful the Kromekote papers are.  I used Kromekote papers in Brushed Silver and White Lizard.  For the card base I used Colormates Textured card stock in Aqua Ribbon.

I knew I wanted to emboss the Brushed Silver Kromekote, but I didn't want it to be overpowering.  I found this Quikutz embossing folder in my stash and thought it would be perfect for an everyday card.
Katrina-Hunt-World-Win-Papers-Hello-Card-Khromekote-1000Signed

Supplies:  Cardstock-WorldWin Papers (Aqua Ribbon Colormates Textured), Kromekote in Brushed Silver and White Lizard; Ribbon-May Arts; Letters-Jillibean Soup; Embossing Folder-Quikutz (Bubbles)


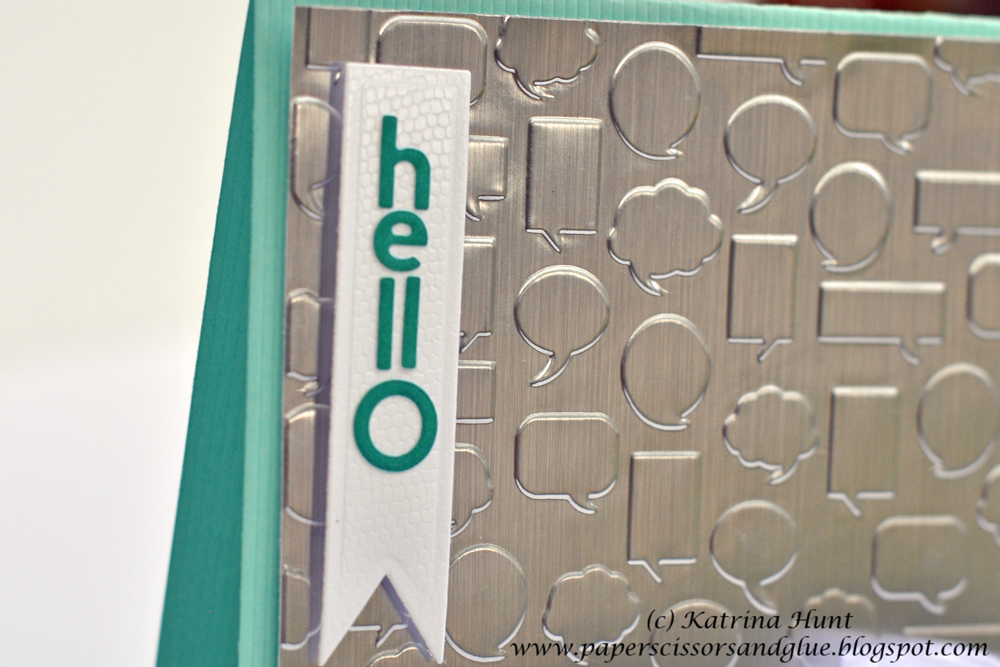
Here is a close up of the detail on the White Lizard Kromekote paper.  I loved how this paper cut and embossed. 
Katrina-Hunt-World-Win-Papers-Hello-Card-Khromekote-Close1000Signed

So, quite the impact, with just a little embossing and little touches here and there.  I am thinking that Kromekote will make some great tags for Christmas presents!  OR, maybe ornaments to hang on the tree!

Thanks for stopping by today on the WorldWin Papers blog!

Katrina Hunt
Paper, Scissors and Glue

Monday, November 25, 2013

Start Each Day With a Grateful Heart


Hi, it's Gini and this weekend I tried a stamping technique that I haven't tried before - bleach stamping.  It sounded a little intimidating, but it was really easy - and the results are a fun surprise depending on the color of cardstock that you use.

I choose to use ColorMates Deep Creamy Cocoa - along with JustRite Stamp's Fancy Labels.  The results reminded me of gorgeous batik fabric.  If you would like to try this technique, just fold a paper towel several layers thick, place on a glass plate, and pour enough bleach on the towel to saturate it.  Then just use this as use would a stamp pad.  I did not have to leave the stamp on the paper extra time - the bleach effect was almost instantaneous.

 The sentiment was stamped from JustRite's  , and the edges were ink distressed in brown.  I also used a flourish from this stamp set at the top of the card.

The bottom half of the card was dry embossed and then inked to bring out the detail.  I die cut 2 of Spellbinder's Fantastic Flourish One (one in pink and one in green).  I cut the pink flowers off of the vine and glued them down on the green base.  I added pearls to the centers.  The large flower was made using Spellbinders Rose Creations, and water distressed to produce a more realistic look. Finally, the leaves were cut from Spellbinder's Foliage set, and the debossed areas were colored with a Copic marker.


WorldWin Papers:
Other Supplies
Tsukineko Ink
Viva Decor 3D Metallic Stamp Paint
Copic Markers
Sizzix Embossing Folder- Regal Flourishes

Tuesday, November 19, 2013

Fall Home Decor

Hello everyone! I have a fun home decor project to share with you today. This is a BRAND NEW project, created just for the WorldWin Blog.


This miniature screen is 6 inches tall and 12 inches wide. It is perfect for a shelf, table, or desk. (A full supply list is located at the end of the post.)

This project is not difficult to make, but it does require a lot of "fussing." To begin. cut a piece of WorldWin Petallics Black Ore cardstock to 6 x 12 inches, and score at 3, 6, and 9 inches.


To make sure that your screen is sturdy, cut four pieces of chipboard to slightly smaller than 3 x 6 inches and attach them to the back of each scored panel of the Black Ore cardstock. (Use chipboard scraps or WorldWin Heavyweight Chipboard, painted with black gesso or covered with black cardstock.) 


Trim four pieces of ColorMates Original Medium Coffee Brown cardstock to 2 7/8 x 5 7/8 inches. Rub the edges with brown ink. Attach the cardstock to the front of each panel. (The chipboard is the BACK of each panel.)


Trim four pieces of designer paper to 2 3/4 x 5 3/4 inches. Rub the edges with brown ink and attach to each panel. For my sample I used Graphic 45 French Country and Magic of Oz papers.

For the next step you need some drying time as we are working with modeling paste.


Place a stencil with a brick design (or design of your choice) onto the third panel. Use a palette knife or an old credit card to smooth some modeling paste onto the stencil. Remove the stencil and wash it. Allow the paste to dry.

I masked off some of my panel and only added the brick design to part of the panel. 


Once the paste is dry, rub it with various colors of ink to create the shading you wish. 

Now comes the fun part! (This next part could be completed while you wait for your paste to dry in the above step.)


Using various fall-themed dies, cut shapes from the following cardstock: Petallics Gold Ore, ColorMates Original Deep Berry Red, Deep Orange Dream, Deep Terra-Cotta, Deep Mari-Gold, ColorMates Smooth and Silky Caramel, Elan Metallics Mocha, Treasures Deep Brown.

Select ink colors to complement the cardstock and "shade" your die cuts as desired. I will explain how to create each element on the project, one panel at a time. 

However, we must first create our title. I spelled out the word "FALL" with chipboard letters. If you wish to create a longer screen to spell "AUTUMN" or "THANKSGIVING," simply attach more panels to the basic one that we are making today.


For my project, I used some 2 1/2-inch tall chipboard letters that I found in my stash. You can use premade letters or die cut letters of your choice. I first painted each chipboard letter with two layers of black gesso (to prime the chipboard and seal it). 

Once the gesso was dry, I rubbed each letter with clear embossing ink and then sprinkled on Tim Holtz Distress Embossing Powder (Vintage Photo). I melted the powder with a heat tool. While the powder was still hot, I quickly sprinkled some areas with Cosmic Shimmer Ancient Copper Metallic embossing powder. Once the powder was cool, I rubbed the surface to activate the distress powder, and I also to rubbed some powder off, exposing the black gesso.

Now, let's create each panel.


For panel one (covered with Graphic 45 French Country Abundance paper), die cut two feathers from Elan Metallics Mocha and ColorMates Original Deep Meri-Gold cardstock. Ink with distress inks. Attach the feathers to the left edge of the panel. Using postage-edge scissors, trim out a November postage image from Graphic 45 Place in Time November paper. Attach the postage stamp image to the upper right corner of the panel with dimensional foam tape.

Attach a chipboard "F" with dimensional foam tape to the left, bottom edge of the panel. 


Using the Tim Holtz Tattered Florals die, cut 6 "daisy" flowers from ColorMates Original Deep Meri-Gold cardstock. Ink as desired. Attach to the panel as shown. 

From Graphic 45 French Country Banners, select the bee/clock element. Using a 1-inch circle punch, punch out the clock and attach it to the center of the flower with dimensional foam tape.


Shape the flower as desired. Make sure your flower does not overlap the next panel.


Panel two is covered with the reverse print of the Graphic 45 French Country Abundance paper. Place the Graphic 45 French Country rooster chipboard element at the top center of the panel.


Use the Sizzix Pumpkin #2 die (or similar) to die cut a pumpkin from Colormates Original Deep Orange Dream cardstock. Ink as desired. Attach the pumpkin to the lower left edge of the panel. 

Use Spellbinders Little Leaf and Fall Foliage dies to die cut small leaves and an acorn from ColorMates Original Deep Berry Red, Deep Orange Dream, Deep Terra-Cotta, and Treasures Deep Brown cardstock. Ink as desired.

Assemble three small leaves at the top of the pumpkin. Add a twine bow. Cover the knot in the twine with a chipboard "franc" from the Graphic 45 French Country chipboard sheet. Using dimensional foam tape, add the acorn to the lower left of the pumpkin. 

Use dimensional foam tape to attach the chipboard "A" to the lower right corner of the panel.

For the panel three you will need a 6-inch tall, fussy cut image. I used the Scarecrow image from Graphic 45 Magic of OZ Scatterbrained Scarecrow paper. This paper is retired and may be hard to find. You may have to find a different image from another source.


The paper I used for this panel is Graphic 45 Magic of Oz Yellow Brick Road (the reverse print). I attach the chipboard "L" to the lower right corner of the panel. I fussy cut the image and attached it to the panel with dimensional foam tape.


Before you attach your image, make sure you know how your panel will bend. Since my Scarecrow is off the panel, I had to make sure his head did not get bent.

For panel four, I fussy cut the crows from the Graphic 45 Scatterbrained Scarecrow paper.


This panel is covered with Graphic 45 French Country Provance paper.  I used the Spellbinders Cherry Blossoms branch die to cut branches from Treasures Deep Brown cardstock.


I attached the branches and a few more of the tiny leaves to the top of the panel. Then I attached the fussy cut crows to the branches with dimensional foam tape. 


Attach the chipboard "L" to the lower right of the panel. Use the Tim Holtz Tattered Leaves and the Spellbinders Fall Foliage dies to cut larger leaves. Ink as desired.

Create a leaf bouquet on the panel as shown. Tuck in some of the branches and an acorn.

This project is a fun way to use up your cardstock scraps by using punches and die cut templates to create shapes. Using layers and ink, you can make unique elements for your projects.


I hope you have enjoyed this fall decor project!

~ Gloria (Scraps of Life)

Supplies:

WorldWin Papers:
Petallics Black Ore, Gold Ore
ColorMates Original Medium Coffee Brown, Deep Berry Red, Deep Orange Dream, Deep Terra-Cotta, Deep Mari-Gold 
ColorMates Smooth and Silky Caramel
Elan Metallics Mocha
Treasures Deep Brown
Heavyweight Chipboard

Other:
Designer paper: Graphic 45 French Country Abundance, Provance; Magic of Oz Yellow Brick Road, Scatterbrained Scarecrow; Place in Time November Cut-Apart
Cardstock elements: Graphic 45 French Country Banners
Chipboard: Basic Grey letters; Graphic 45 elements
Stencil: Studio 490 Brick Wall
Ink: Clearsnap Top Boss Watermark; Clearsnap Pigment Chestnut, Ochre, Roussillion; Ranger Distress Vintage Photo, Rusty Hinge, Aged Mahogany, Dried Marigold, Spiced Marmalade, Wild Honey
Embossing powder: Ranger Distress Vintage Photo, Cosmic Shimmer Ancient Copper Metallic
Die cuts: Tim Holtz Writing Desk, Tattered Florals, Tattered Leaves; Sizzix Pumpkin #2; Spellbinders Little Leaf Sets, Fall Foliage, Cherry Blossoms
Punch: Stampin' Up 1" Circle Punch
Gesso: Liquitex black
Modeling paste: Liquitex
Twine: May Arts
Tools: foam brush, palette knife, Couture Creations handheld essentials, Provo Craft deco scissors
Adhesive: Scotch 3M ATG tape; Scrapbook Adhesives by 3L 3D Foam Squares; white glue